Tips & tricks for your YAY photo book
Are you creating a photo book with YAY for the very first time? With YAY you print your photo book directly from your online journal.
YAY's journal software and the photo book designer work independently of each other. Your online journal will therefore not be affected by adjustments in your photo book.
Watch our intro video to get an overview! Then watch the mini-tutorials to customize the design of your picture and text elements.
Overview tutorials
At a glance
Sound on for English voice-over!
Start your YAY today!
Choose a domain for your personal Online Journal and start your legacy of love!
Yay, let's go!After the free 30-day trial subscription, you decide whether you want to start a paid subscription. If not, we won't charge you anything.
Change the template
Do you prefer a different picture layout for a certain page?
Click on "Change template" to rearrange your images within the double page. Templates with many pictures offer more possibilities for variation than templates with just 2 or 3 elements on one page.
Depending on whether you are creating your photo book on your smartphone, tablet or PC, the “template change” button is located to the right of or below the displayed photo book page.
Move picture and text containers to another page
Do you want to have more pictures and texts on a double page or merge entries?
If you want to move pictures and texts from one double page to a new one, click on the yellow button "Create new page". If you want to add pictures or text to an existing page, click on the yellow button "Move here".
Since there is no background in a YAY photo book, the page from which you remove the images automatically receives a new template, as does the target page. This means that the image arrangement of the start and target pages changes when elements are removed and added. It's magic 😊
Swap pictures and text containers on the same page
Would you like to swap two image/text elements within a double page? That's how you do it:
Click on the picture you want to swap. You will now see the exchange buttons light up on all pictures.
Click on the target image. Both pictures swap their position. You can also swap images with texts in this way.
Swap pictures and text containers across pages
You can also swap your picture and text containers across pages:
Go to "Page overview".
Select the photo you want to swap. A yellow frame appears around your picture.
Scroll to the target picture. It doesn't have to be one of the next ten pages, you can also jump further forwards or backwards by using the page ranking at the bottom. The activation remains across all photo book pages until you have clicked on your target picture.
Pan a picture to position and scale it
Would you like to pan a picture to the left, right, up or down? Click in the picture and pan it in the desired direction with your mouse or finger.
Scale the frame to zoom a picture
Do you see the little handles on the frame of each picture and text container? You can use them to scale the frame of each container.
It will zoom your pictures in and out: If you enlarge a container, the image zooms in.
If you minimize a container, it zooms out. Yes, that’s logical :D See for yourself:
Edit text, date, and headline of your journal entry
Want to customize the content of your text containers?
Click in the text box
Click on the pencil symbol
A text window opens. You can now change the heading, subheading, and text you wrote. By default, the date appears as a subheading. You can also enter words.
Change the color of the headline
You can select the color for headings that stand alone. Standalone headlines are detached from a text box and placed directly on a picture.
The default color for headings is black. You can change the color to white or choose a contrasting background to assure the best legibility for your headline.
Click on your standalone headline. (can also be the title on your cover)

Click the edit icon with the pencil in the upper right corner.

Change the color of the heading or choose a contrasting background.


Change the position of your headline
You can change the position of your headline on some templates.
Click on your stand-alone headline.
Click the pencil button in the upper right corner.
An editing box opens. You find the “Change position” button next to the color option.
Please note: If there is no second place for the heading due to the arrangement of the pictures, the "Change position" button does not appear. This happens, for example, when you have a lot of small or narrow pictures.
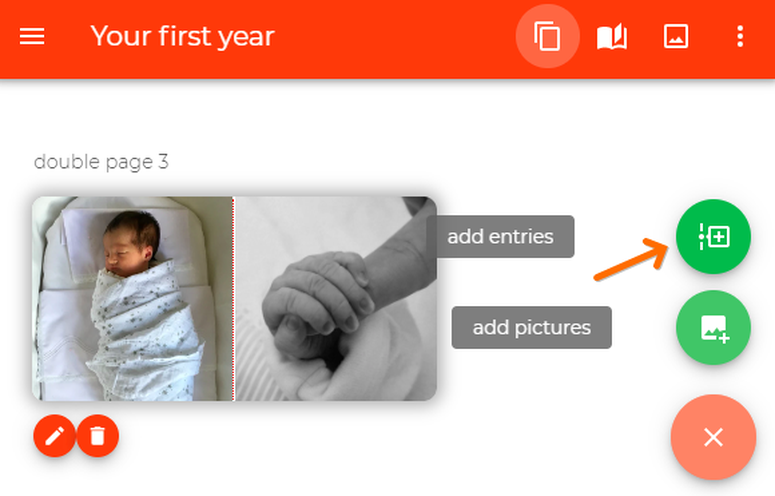
Add journal entries
Your photo book is almost finished, but now you want to a diary entry? No problem:
Click on the orange pencil icon in the bottom of the right corner of the page overview.
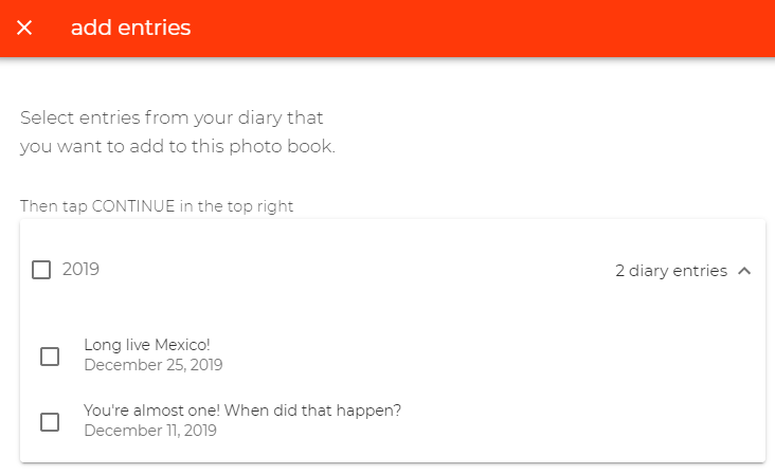
Now you see a green button called "Add diary entries". Select it.
A list with all your diary entries opens. Choose the one you want to add to your photo book.


Add pictures
Do you want to add pictures to your photo book that you have not saved in your online journal?
Click on the orange pencil icon in the bottom right corner of the page overview.
Select the green button "Add pictures" appearing in the bottom of the right corner.

Drag new pictures into the highlighted field.

Once the upload of your pictures is finished, click CONTINUE.

Add your pictures to a new page by clicking on the orange PLUS. You can then add your image to another page as usual.

How will my videos appear in the photo book?
Did you embed videos into your YAY online journal via Vimeo? Our photo book designer displays videos as a link. When printed, these links are converted into discreet QR codes that you can read in with your smartphone.

Missing something?
We're happy to hear from you!
We design your photo book with you and offer quality assurance on request.
- Phone number
- +491746004263
- imme@yaymemories.com